You may be looking to upgrade your video equipment with Black Friday and Cyber Monday deals. To help you out, I am sharing what we have learned over the past 18 months of starting video content production, as we have been asked by a lot of advisors what we are using.
A little background first. I am chronic researcher and advice seeker, yet with all the people I talked to and the things I read, I would still do it differently knowing what I know now. I am sure that 5 years from now I will say the same.
I have kept this list basic but know as you get more into videos, the more in depth you will get on equipment. Like many things in life as you get better equipment, it performs better but it also is more work to learn and operate. Also, your goals such as recording 1-3 minute videos or recording entire speaking sessions or filming in one place compared to several places will dictate a lot of your decisions.
You would be surprised just how much you can do with an iPhone. I always recommend getting started with the iPhone and then moving up as you get more videos. Stop researching and just get started.
I have included links and prices to help you out, which are mainly to Amazon and B&H. I am not affiliated with either, or any company mentioned below and receive no compensation from any of them. They all have good prices, service, and selection. These prices were accurate at the time I wrote this blog.
With that being said, here is the equipment we recommend.
1. Tripod
Even if you are just using your iPhone this can be a big help. It will save you time and make your life a lot easier. You can just stack up books and random objects and try to play the balancing game, but at less than $25, do yourself a favor.
You can go cheap to start here as we did. However, if you carry them from place to place and use them a lot they will break. It’s like buying an Old Navy shirt, it will look good and do the job but if want it to last you must upgrade. I know it may not seem like it but the prices on Tripods can get outrageous.
Best cheap tripod:
AmazonBasics 60 Inch Lightweight Tripod with Bag $22.08
https://www.amazon.com/AmazonBasics-60-Inch-Lightweight-Tripod-Bag/dp/B005KP473Q
Best bang for your buck:
Manfrotto (they are the most popular name in tripods) Compact Advanced Aluminum Tripod $99.98
This is their budget and travel model. It is high quality and sturdy, much cheaper than the studio one that everyone has that is over $300
2. Tripod mounts
To use your tripod effectively you will need something to attach it to your equipment. I have included ones for your phone, tablet or camera:
Universal Quick Release plate
You will need this to attach a camera or camcorder to a tripod.
Universal Quick Release plate $3.50
iPad mount
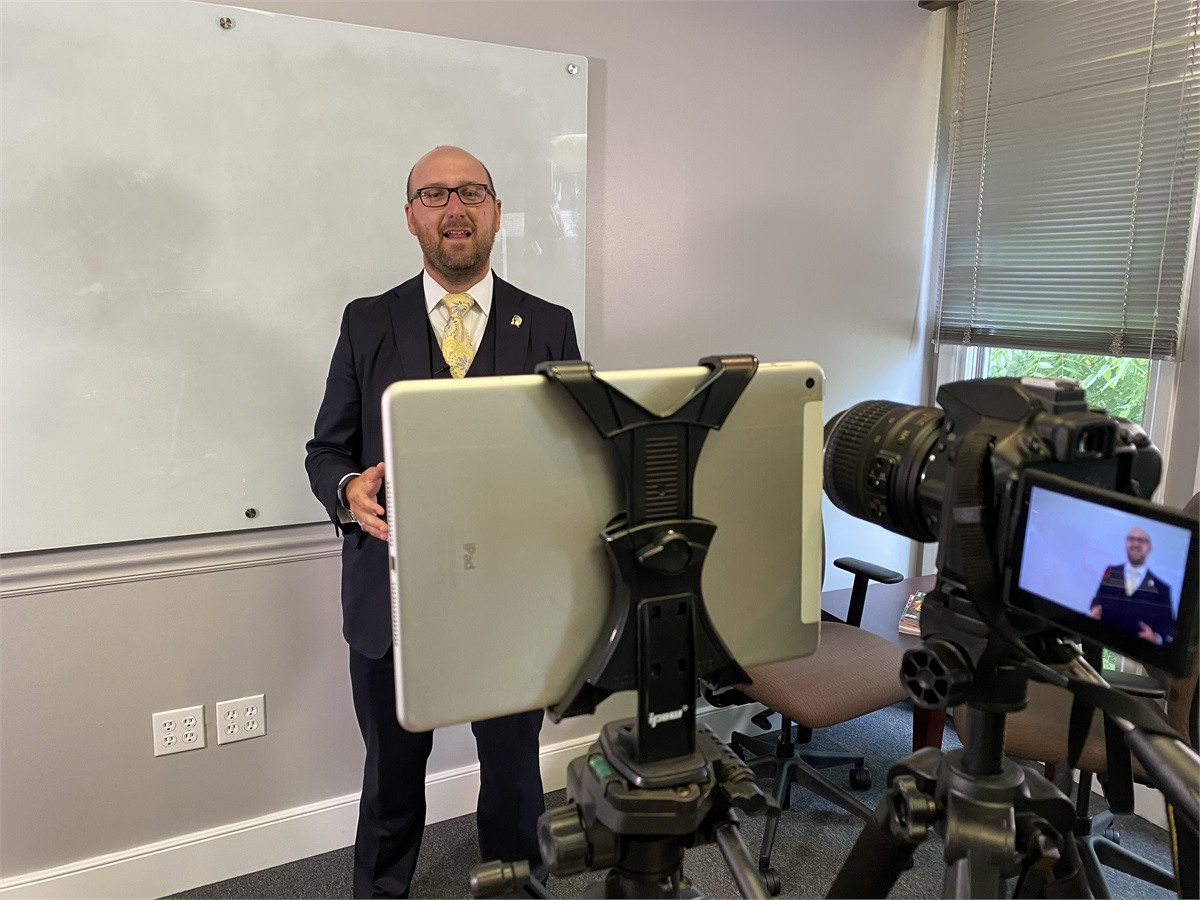
If you want to film with your iPad or tablet, this attaches it to your tripod. Works on all tablets and you can use this to turn your tablet into a teleprompter.
IPOW iPad Tripod Mount Adapter $19.99
iPhone Mount
If you want to film with your smart phone this attaches it to your tripod. Works on all phones.
Phone Tripod Mount for iPhone with Remote $9.99
3. Lights
These are so important if you want to take your videos to the next level. You can use your phone on a tripod with lights and come out looking professional! This is way more important than a camera. We have gone through several sets of lights before finding these. They are super lightweight. They are easy to use and have 99 settings of brightness which can be adjusted at the turn of a knob. They can also be adjusted by remote if you are doing a solo shoot. They come with a carrying case for mobility. They just are outstanding!
VILTROX Led Panel Lights with Stand Kit $177.29
https://www.amazon.com/gp/product/B07D798TZ4/ref=ppx_yo_dt_b_search_asin_title?ie=UTF8&psc=1
If you want to be able to use without plugging in, you can get two of these battery packs (one set for each light) $35.98 each
https://www.amazon.com/gp/product/B0761SH551/ref=ppx_yo_dt_b_search_asin_title?ie=UTF8&psc=1
4. Subtitles
After upgrading to lights this should be your next priority. It’s often stated that over 80% of videos on social media are watched on silent. Most people will watch as they are on their phones and don’t want to have volume on. That is why you notice almost all popular videos on social media now have subscripts. We use these for all our videos and it not only increases engagement, but it also helps compliance approve faster because they can read our words on the screen and not have to strain to figure out what we said. Also, the app we use you can take the script and use it as a blog (two pieces of content for the work of one).
ClipScribe
They have three packages ranging from $96 a year to $288 a year
5. Microphones
Lights are the most important and with a lot of people just reading subtitles it’s easy to disregard the importance of a quality microphone. Everyone wants to focus on cameras and editing but without quality sounds it’s all useless. A lot of people will probably tell you to get a boom mic because they are easy to use and the most versatile. You will most likely be shooting these as one person in a big room which can cause some issues. I recommend making the investment in a lavalier mic. Basically, a boom mic sits on the camera or held above the person being taped and picks up all the sound like your phone does, but it’s directed at the person speaking. A lavalier microphone is on the person and generally picks up high quality sound of that person. Think of the microphones you see clipped on a lapel or people being “mic’d up” for a reality show. There are a lot more to mics than this. There are many differences of the two types I mentioned and you can get down a deep rabbit hole. Here I give the two main types and my recommendations:
Lavaliers (what I think you should buy)
Sennheiser EW 112p G4 (be very careful the frequency you but make sure its 516-558mhz) $499
This is what I own and what you see used. It is a commercial grade that you would see in a mega church or professional speaking environment. It is not the top of the line but it’s high quality. It has a lot of flexibility and features, but it is also pricy. It does take a very small learning curve to understand.
Rode Wireless go Compact
This is very popular with entry level video making like we do. It is a great setup with way less learning curve than above, but also way less versatile. You can buy just the set up and then a mic or the package. I give links to both ways.
Rode Wireless go Compact wireless omni lavalier microphone system kit $278
https://www.bhphotovideo.com/c/product/1496263-REG/rode_wireless_go_compact_wireless.html
Rode Wireless go Compact Digital Wireless microphone system $199
https://www.bhphotovideo.com/c/product/1471382-REG/rode_wireless_go_compact_wireless.html
Rode Lavalier Go Omnidirectional Lavalier Microphone only $79
EG/rode_lavgo_lavalier_go_omnidirectional_lavalier.html
Boom Microphones
Rode Video Mic Go Camera Mounted Shotgun Mic $99
This is the boom mic that comes with the M50 kit I will recommend with cameras. It’s very popular. I do not like it because it does not give you as much control over the sound. However, for ease of use mixed with quality it’s a good pick.
Rode Video Mic Pro Camera Mount Shotgun Microphone $229
In my opinion, if you are going to use a boom, get this. The main reason above better quality of sound is it lets you mess with the “hotness” without having to use professional equipment.
https://www.bhphotovideo.com/c/product/1350282-REG/rode_vmp_videomic_pro_on_camera_shotgun.html
DeadCat Boom Mic Cover
If you use a boom buy one of these. It cancels out the “wind” or other unwanted sounds.
Rode DeadCat $39
https://www.bhphotovideo.com/c/product/1409267-REG/rode_deadcat_vmprp_furry_wind_cover_for.html
6. Teleprompter APP
It’s not easy at first to read from a teleprompter but once you get used to it, it will save your time. First, we get our video scripts approved by compliance before making so we don’t have to worry about reshooting them, so reading from the script is crucial for us. However, having a script and putting the time in before you are on camera will save anyone time. Lastly, reading from a script saves a lot of time in post-production editing.
Cueprompter – $ Free
This is free! We started out with this and used it for a year. It worked well for free but you need two people to do it effectively because you have to manually start and pause it and can only do one speed. We used a Bluetooth remote on an iPad that was mounted on a tripod by the camera. It works great for free and for what it is. However, it makes it really hard to do compared to having the paid app. The constant start and pausing can be frustrating to get used to.
Promptsmart $19.99
If I knew then what I knew now! The first time you use this app, it will pay for itself. It will listen to your voice and move the screen for you. It is hard to believe until you see it work. It’s amazing!!!! It does need to be close enough to hear your voice. We bought a cheap wired lavalier microphone for $20 (BOYA https://www.amazon.com/gp/product/B00MP566OM/ref=ppx_yo_dt_b_asin_title_o08_s00?ie=UTF8&psc=1 ) to connect to my iPad so it can hear my voice and keep up with me. I love love love love this app!!!
7. Teleprompter
When using the teleprompter apps, you can use a phone or iPad like we did, but for $200, this will save you so much time it pays for itself. I put the camera or phone right behind the teleprompter and creates an easier and smoother filming experience. This is a time saver. It’s also really portable.
Glide Gear TMP 100 $199
Comes with carrying case. Super light, high quality, easy to set up and universal. Works with any tablet or phone size and just about any camera size.
https://glidegear.net/products/glide-gear-tmp-100-ipad-smartphone-video-teleprompter
8. Camera
Notice this is number 8 with equipment! Do not spend on this first. There are two major differences Camera vs. Camcorder. A camera takes pictures and videos but due to regulations and capabilities it can only be max 30 minutes of videos (some are as low as 15 minutes). If you want to record long presentations, you will need a camcorder. A camera will allow you to get better quality being able to change lenses and allow you to take amazing pictures (think no need to spend money on headshots etc.). They both have their pros and cons. When you get into cameras it is a whole world. People are super into brands and set ups. There is mirror vs mirrorless and it could go on. I am keeping it simple. I use Canon simply because I have found like Dell it’s so commonly used its easier to get help with than any other. For a camera I recommend the M50 because it was designed to help people create online content so it’s really perfect for this application. I am giving you the camera and the camcorder options. Also don’t worry about 4k…. it kills battery, takes tons and tons of memory, and is cumbersome to edit due to size. It does not look amazing unless watched on a desktop and considering most people watch on phones, what is the point. Just shoot in 1080.
DSLR Camera
Canon M 50 Package (comes with boom mic and much cheaper than buying separate) $699
https://www.bhphotovideo.com/c/product/1393464-REG/canon_2680c067_eos_m50_mirrorless_digital.html
Regular M50 with universal lens $649
https://www.bhphotovideo.com/c/product/1393461-REG/canon_2680c011_eos_m50_mirrorless_digital.html
Camcorder
Canon Vixia HF R $249.99 (we use a 4k one but don’t recommend the extra spend)
https://www.bhphotovideo.com/c/product/1308395-REG/canon_1960c002_vixia_hf_r800_camcorder.html
9. Interface
If you spend the money on microphones and you start producing more, you may want to invest in an interface. This brings analog audio into the digital world. In other words, it brings your microphones right into you computer to monitor them in real time. It also will help to create a second audio file in addition to camera file as a backup. This allows you to control your sound and create a better product. We use the Focusrite Scarlett 2i2 that has two ports but if you plan to only use one microphone you can get the Scarlett solo with only one port.
Fousrite Scarlett 2i2 $159.99
Focusrite Scarlett Solo $109.99
10. Editing
You can send this out to a company to do this work for you. We use a local company called Create Change Designs to do some of our postproduction and save us time. However, we also do a lot of it inhouse to save money. Windows and Apple have basic editors that you can use but they are very basic and have very limited capabilities. We use Adobe Premier for video editing and Adobe Audition for sound recording. They are both widely used and easy to find help videos on. We paid a consultant (Create Change Designs above) to teach us the basics and how to use the software. They are both part of the Adobe Creative cloud suite which is $59.99 per month per user.
https://www.adobe.com/creativecloud/plans.html?plan=team&promoid=QBWYPMYV&mv=other
11. Travel bags and cases
If you plan to record at different offices or locations, it will help to have the ability to safely and effectively carry your equipment. Here are the bags I use and recommend.
Mics Case
If you invest in a lavalier microphone and it doesn’t fit in the camera bag use this:
CASEMATRIX Condenser Capsule
https://www.amazon.com/gp/product/B00YO92JTS/ref=ppx_yo_dt_b_search_asin_image?ie=UTF8&psc=1
Camera Bags
This is the best bag I have found for carrying cameras, the supplies, and a tripod:
LowePro Flipside Camera Backpack $109.95
https://www.bhphotovideo.com/c/product/1376625-REG/lowepro_lp37127_flipside_300_aw_ii.html
12. Video Storage and Viewing
You will want to make sure you load videos directly on the platform. For example, if you are using LinkedIn, load the video to LinkedIn instead of a link to a viewing platform. This will increase views because algorithms are designed to keep people on that social platform. However, you will still want to be able to embed to your website and share via email. I recommend VIMEO. For starters unlike YouTube you can keep it commercial free and it looks more professional. It allows you turn off comments (hello compliance). It allows you to control who can see the video through several options. It allows you to enable someone to download the video from there (if you enable them) which frees up storage space on shared drives and computers and then makes sharing with different editors easy. Lastly it gives you the ability to change the video without changing the link. This is a great feature when you make updates to the video but do not have to update the embedded link.
The have several plans from free to hundreds of dollars.
You have all the advice you need. Just start creating content! If you have questions let’s connect on LinkedIn or send me an email. If you found this useful, please share this with a friend.

Make Your Vision Great Again: Why Clarity Wins
As leaders, we often assume our message is clear. We see the vision vividly, like a movie playing in our heads.

An Impact So Great Our Community Would Weep If We Closed Our Doors
Part of our 412 Vision at Beratung Advisors is to have “An Impact so Great Our Community Would Weep if We Closed Our Doors.”

Generational Planning for Yinz
After eight years, we are changing our tagline from “Guidance with a Plan” to “Generational Planning for Yinz.”

4 Keys to Hearing God’s Voice
I first learned these 4 keys to hearing God’s voice on an L3 Mastermind Retreat from my friend Andrew Reichert, and it changed my life.

Give ‘Em The Pickle
We believe that a big part of culture is shared language. We have a shared language we call the Beratung Vernacular that helps us all row in the same direction.

13 Lessons I Learned From My Dad
My father was called home to be with God 13 years ago on Thanksgiving Day, November 24th, 2011. Today would have been his 76th birthday. There is not a day that goes by that I do not think of my dad. In his memory, I wanted to share the 13 most important lessons he taught me, one for each year he has not been with me.


